
Building a Web-Controlled Lamp with ESP32 (MCU support Wifi)

With over a decade of hands-on experience, I specialize in building robust web applications and scalable software solutions. My expertise spans across cutting-edge frameworks and technologies, including Node.js, React, Angular, Vue.js, and Laravel. I also delve into hardware integration with ESP32 and Arduino, creating IoT solutions.
This article builds upon the previous one, diving deeper into the process of building a web-controlled lamp using an ESP32 microcontroller and delving into the code relying on a server on the web.
Unveiling the Magic
The secret ingredient? Web Server through WiFi communication. By leveraging the ESP32's built-in WiFi capabilities, we'll create a web server directly on the microcontroller, allowing it to interact with your web browser without relying on external servers.
Hardware Essentials
ESP32 Board: Any board supporting Wifi will work for this project.
RGB LED: A multi-colored LED to add a vibrant touch to your lamp.
Jumper Wires: Essential for connecting various components.
Breadboard: Simplifies prototyping and wiring.
Computer with Arduino IDE: Used to program the ESP32.
Constructing the Lamp Circuit
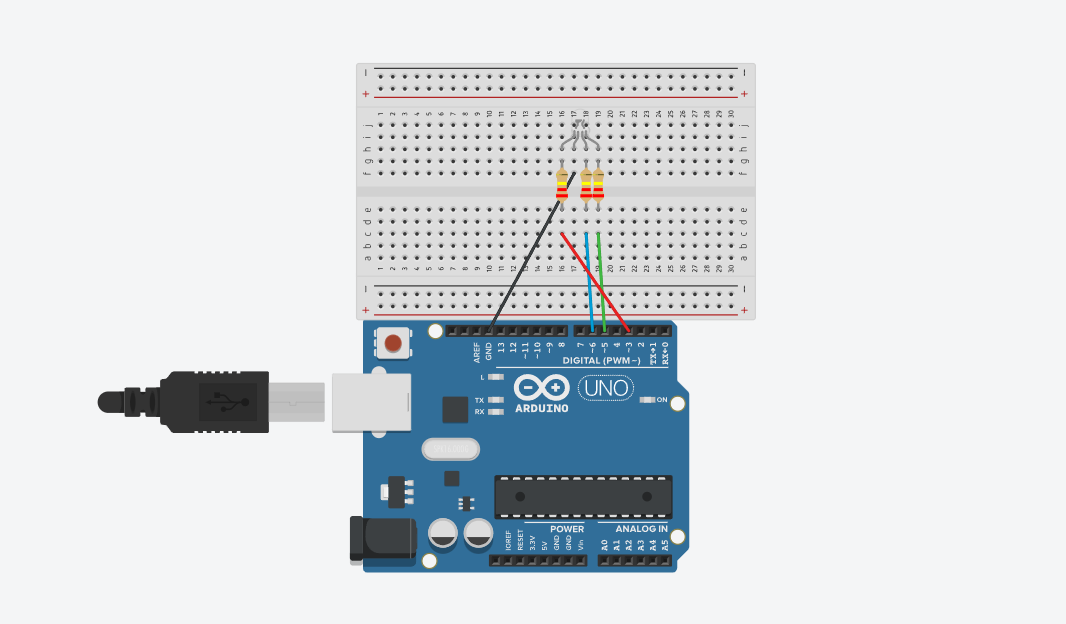
Before diving into the code, gather your components. Assemble the circuit based on a diagram or your preferred configuration. Connect the ESP32 to the RGB LED, ensuring each color (red, green, and blue) is connected to a specific ESP32 pin (consult your ESP32 board's documentation for specific pin assignments). Remember to power the LED appropriately, often requiring resistors in series with each LED leg.
Dive into the Project Code
The magic behind this web-controlled lamp lies within the code, and don't worry, you don't need to be a programming wizard to understand it! We've provided all the necessary code on GitHub: webserver-communication-mcu. This repository contains:
ESP32 Code
Frontend Code: This code, written in Reactjs
Exploring the Code:
The provided GitHub repository includes a detailed readme file that walks you through running the whole project.
Crafting the Code Symphony: The ESP32 Side
Now, let's orchestrate the communication between the ESP32 and your web browser. The ESP32 code acts as a mini web server, accepting requests from your browser, interpreting the color information, and adjusting the LED's brightness accordingly.
ESP32 Code:
#include <WiFi.h>
#include <WebServer.h>

const byte PIN_LED_R = 23;
const byte PIN_LED_G = 22;
const byte PIN_LED_B = 21;
const char *ssid = "WifiName";
const char *password = "WifiPassword";

WebServer server(80); // Create a web server on port 80

void setup()
{
  Serial.begin(115200);
  pinMode(PIN_LED_R, OUTPUT);
  pinMode(PIN_LED_G, OUTPUT);
  pinMode(PIN_LED_B, OUTPUT);
  // Connect to WiFi
  WiFi.begin(ssid, password);
  while (WiFi.status() != WL_CONNECTED)
  {
    delay(500);
    Serial.print(".");
  }
  Serial.println("");
  Serial.println("WiFi connected");

  // Print ESP32 IP address
  Serial.println(WiFi.localIP());
  server.enableCORS();
  // Handle incoming requests
  server.on("/", handleRoot);
  server.on("/setColor", handleSetColor);
  server.begin();
}

void loop()
{
  server.handleClient();
}

void handleRoot()
{
  server.send(200, "text/plain", "Hello World! Call to ESP32");
}

void handleSetColor()
{
  String colorData = server.arg("color");
  Serial.println("Received color: " + colorData);
  parseAndDisplayColor("#" + colorData);
  server.send(200, "text/plain", "Color set!");
}

void displayColor(byte r, byte g, byte b)
{
  analogWrite(PIN_LED_R, r);
  analogWrite(PIN_LED_G, g);
  analogWrite(PIN_LED_B, b);
}

void parseAndDisplayColor(String data)
{
  if (data.length() == 7 && data[0] == '#')
  {
    // Extract hexadecimal values for R, G, and B
    long hexValue = strtol(data.substring(1).c_str(), NULL, 16);

    int r = (hexValue >> 16) & 0xFF;
    int g = (hexValue >> 8) & 0xFF;
    int b = hexValue & 0xFF;

    // Display the color
    displayColor(r, g, b);
  }
}
Includes & Constants:
#include <WiFi.h>,#include <WebServer.h>: Brings in necessary libraries for WiFi connectivity and creating a web server.const char* ssid = "Your_WiFi_SSID";,const char* password = "Your_WiFi_Password";: Stores your WiFi network's name and password. Replace the placeholders with your actual credentials.const byte PIN_LED_R = 23;, etc.: Defines the GPIO pins connected to the red, green, and blue channels of your RGB LED. Adjust these if you're using different pins.const int port = 80;: Standard port for HTTP web traffic.
setup() Function:
Serial.begin(115200);: Initializes serial communication for debugging purposes (optional).pinMode(PIN_LED_R, OUTPUT);, etc.: Configures the LED pins as outputs.WiFi.begin(ssid, password);: Starts the WiFi connection process.while (WiFi.status() != WL_CONNECTED) ...: Waits in a loop until the ESP32 is connected to your WiFi network.server.enableCORS();: Enables Cross-Origin Resource Sharing (CORS), critical for allowing the web browser to access the ESP32 server.server.on("/", handleRoot);,server.on("/setColor", handleSetColor);: Maps different URL paths to handler functions (explained below).server.begin();: Starts the web server.
loop() Function:
server.handleClient();: Continuously checks for incoming requests from the web browser and handles them.
handleRoot() Function:
server.send(200, "text/plain", "Hello from ESP32! Control the lamp using /setColor?color=HEX_CODE");: Sends a basic text response when the root URL (/) is accessed, with instructions on how to control the lamp.
handleSetColor() Function:
String colorData = server.arg("color");: Retrieves the color value (in hexadecimal format) sent from the web browser as part of the query string.parseAndDisplayColor("#" + colorData);: Parses the color string and calls a function to control the LED.server.send(200, "text/plain", "Color set!");: Sends a confirmation message back to the web browser.
displayColor() Function:
analogWrite(PIN_LED_R, r);, etc.: Uses Pulse-Width Modulation (PWM) to control the brightness of each color channel of the RGB LED, creating the desired color.
parseAndDisplayColor() Function:
if (data.length() == 7 && data[0] == '#') ...: Checks if the received color data is valid (a 7-character string starting with '#').... long hexValue = strtol(data.substring(1).c_str(), NULL, 16);: Converts the hexadecimal color code to a numerical value.int r = (hexValue >> 16) & 0xFF;, etc.: Extracts the red, green, and blue components from the hexadecimal value.
Frontend Code:
import { useState } from "react";
import "./App.css";
import Lamp from "./Lamp";
import axios from "axios";

function App() {
  const [lampColor, setLampColor] = useState("#f1c40f");
  const [isFinished, setIsFinished] = useState(true);
  const ipEsp32 = "192.168.1.24"; // Change to the Esp ip adress
  const handleColorChange = (e) => {
    setLampColor(e.target.value);
    sendDataToArduino();
  };

  const sendDataToArduino = () => {
    setIsFinished(false);
    axios
      .get(`http://${ipEsp32}/setColor?color=${lampColor.slice(1)}`)
      .then((response) => {
        console.log(response.data);
        setIsFinished(true);
      })
      .catch((error) => {
        console.error("Error sending data to Arduino:", error);
        setIsFinished(true);
      });
  };
  return (
    <div className="flex h-screen items-center justify-center">
      <Lamp color={lampColor} />

      <div className="ml-4">
        <label htmlFor="colorInput" className="text-gray-700">
          Lamp Color:
        </label>
        <input
          disabled={!isFinished}
          type="color"
          id="colorInput"
          value={lampColor}
          onChange={handleColorChange}
          className="ml-2"
        />
      </div>
    </div>
  );
}

export default App;
• const ipEsp32 = "192.168.1.24";: Stores the IP address of your ESP32 device, assuming it's connected to the same network as your computer/phone. Replace this with the actual IP address of your ESP32.
axios.get(...): Uses Axios to make a GET request to the ESP32's web server endpoint (/setColor) with the following:http://${ipEsp32}/setColor?color=${lampColor.slice(1)}: This constructs the URL for the request using template literals. It includes the IP address, the endpoint path, and appends the selected color information after removing the leading "#" character fromlampColor..then((response) => {...}): This part executes if the request is successful. It logs the response data (likely a confirmation message from the ESP32) and setsisFinishedback totrue(indicating completion)..catch((error) => {...}): This part handles any errors that occur during the request. It logs the error message and setsisFinishedback totrueto potentially re-enable user interaction.
Congratulations on building your web-controlled lamp! This project demonstrates the power of the ESP32 and the exciting possibilities of the Internet of Things. By combining hardware, software, and programming, you've created a practical and interactive device.
Feel free to explore further by experimenting with different LED colors, adding features to the web interface, or controlling other devices using the ESP32. The world of IoT is full of possibilities, and this project serves as a foundation for your future endeavors in this exciting field!